| ||||
|
| |||
Tweaking for gamingWith today's version of the popular operating system called Windows, tweaking is important. Tweaking is the process of configuring your computer to run faster, more efficiently and more be more stable. You've probably already learned how to tweak your server (training video), but now, you'll learn how to tweak your gaming computer to be really fast and produce more frames per second (FPS) while playing 3D games! The process of tweaking a gaming computer is somewhat similar from the steps of tweaking a server, although, you'll learn some important stuff that only applies to a gaming computer. This tweaking guide is divided into 4 parts:
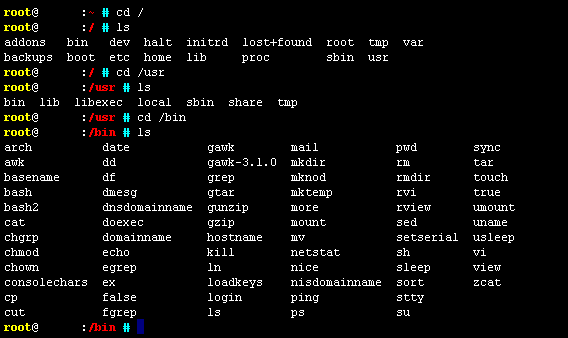
Part 1 Luna Theme There are two primary ways that we can interact and share with our computer. One is the console and the other way is called the graphical user interface. Here's a comparison of both:
The console screenshot has been taken from a Linux computer while the GUI screenshot has been taken from Windows XP. Today, the console is quite old and some might even call it obsolete. I call it fast, easy and efficient! But because of gaming, we have no choice but to use Windows with it's GUI. By default, Windows XP uses a GUI theme that's called Luna. Here's a comparison between the Classic and Luna theme:
is somewhat cooler than the traditional Classic skin but it can cause a performance decrease. For example, Luna uses 4 MB of RAM and there is a bug that makes Internet Explorer render pages 75% slower with the Luna theme enabled. I strongly recommend you to disable Luna by following these steps:
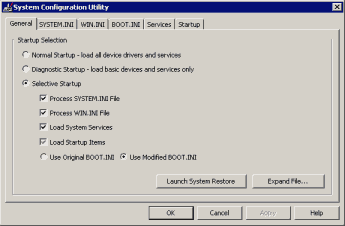
Custom themes Because it's custom, these programs need amazing amounts of RAM and CPU. They'll most likely kill your FPS while playing games and slow down your system's responsiveness. My advice? Uninstall any custom themes you have and please use the Windows Classic theme. If you spend a lot of time enjoying games, you won't even be watching your customized "Windows 3004" theme because you'll be fragging people! Part 2 Faster Boot up Here's how we view the processes who are supposed to start at startup:
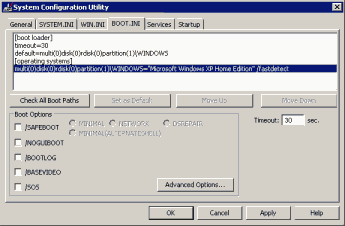
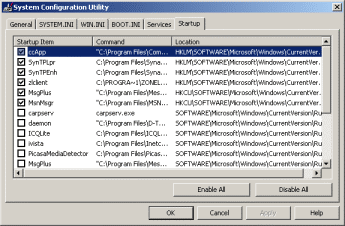
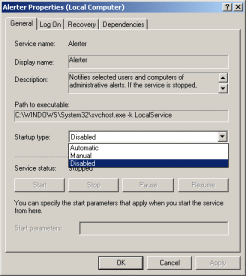
Now, this window is supposed to appear: Before tweaking the startup processes, we'll take a look at the way windows start up. Go ahead and click on the BOOT.INI tab: Now, click on the checkbox near /SOS: What this checkbox will do is that it will disable the Windows boot screen and, instead, will the display the list of the DLLs that Windows is currently loading. This will decrease your boot time by a bit and will even offer a greater debugging feature because if Windows fails, you'll see at what DLL it exactly failed! Tweaking processes This list contains all the processes that are started are startup. In my list, you can see MSN Messenger, MSN Messenger Plus, Norton AntiVirus and ZoneAlarm. My processes list is already tweaked as these processes are the only ones I use. You can see that my disabled processes aren't checked. You should go through this list and uncheck the processes you don't use or don't know about. You'll probably want to search the processes' name in HLDS 101 Search (Powered by Google) to see if it can harm to your computer if disabled. Part 3 Introduction The problem with Windows is that there are a lot of useless services that are running all the time. Sadly, I won't be able to recommend which services to disable as each and every computer is different. What I will show you in this part is how to disable services and where to find information about useless and usefu services. Disabling services To disable a service, you double click on the service you want to disable and a dialog similar to this one should pop up: Here are some useless services that you could probably disable:
Otherwise, if you want to "super-tweak", I would recommend you to check out the Services page from the Windows god (yes, it's BlackViper): http://www.blackviper.com/WinXP/servicecfg.htm Part 4 Defragmenting To eliminate fragmentation, you need to defragment your drive each month or so. Open the windows defragmenter by going to the Start menu, then programs, then accessories, then System Tools and then click on Disk Defragmenter. Then to defragment, click on the Defragment button. | ||||
| ||||